Posts

Showing posts with the label ubuntu

Fix - quick search box not visible in synaptic package manager.

Image
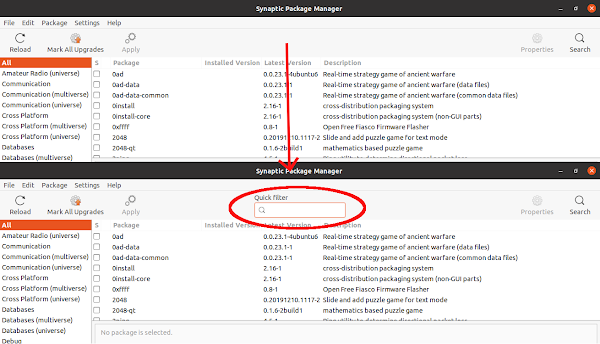
Problem I like to install software using synaptic package manager rather than using Ubuntu software center or using gnome software center . Recently I have noticed that the quick search or filter box is disapeared from the top bar of the synaptic package manager. I this post I will discuss how to get the quick filter box back. Solution The quick serch box is provided by the package apt-xapian-index , and it does not installed by default with synaptic since it is in the recomended dependency list. So to solve the problem, we just have to installed the package and rebuld the search index. To install the package, run the following command in terminal sudo apt install apt-xapian-index After installing the package, we have to rebuild the search index, which we can do by running the following command in the terminal. sudo update-apt-xapian-index -vf Now if you lunch the Synaptic Package Manager , we can see that the quick search box is there, and if we type anyth...

Getting time google.com

Some time setting up time using ntp server does not work in Ubuntu, especially when you are inside some kind of proxy. And setting up time manually may not be accurate and obviously you need to know time properly. But there is way in which you can set time using time stamp from google. Just open the terminal and run the following command. date -s "$(curl -sD - google.com | grep ^Date: | cut -d' ' -f3-6)Z" Hope this will help. Cheers A. Paul

Installing SciDaVis on Ubuntu 20.04

Image
SciDaVis is a free and open source application to visualize and analyze scientific data. This is kind of clone to the proprietary and commercial applications like Origin and Igor pro. This application can generate 2D and 3D plot and perform functions like curve fitting or Fourier transform. Problem The application is not available in the Ubuntu software center, so we can not directly install from Ubuntu repository. Solution: The latest version of the application is available on the GitHub, you can see it here. The easiest way to install the application is by using the prebuilt binary package. You can either download the deb file or install by adding the repo. I prefer the later because it will automatically update the application using the Ubuntu software update. The instruction can be found here. Go to the link, select Ubuntu and select Add Repository and Install Manually. Following are the command to install int in Ubuntu 20.04. sudo sh -c "echo 'd...

Ibus is not working in Ubuntu 14.10

After updating to Ubuntu 14.10 Bus was not working, I have followed the answer given in the question (first question is working) and now it is working. I am using Ibus avro for bengli, I had to reinstall Ibus avro once again. Answer is given here. Run a system update: sudo apt-get update; sudo apt-get upgrade. Remove ibus-pinyin and install ibus-libpinyin: sudo apt-get remove ibus-pinyin; sudo apt-get install ibus-libpinyin. Open a terminal and run im-config, then click "OK" and "YES", then select "ibus" and click "OK" twice. Reinstall ibus and ibus-gtk: sudo apt-get --reinstall install ibus; sudo apt-get --reinstall install ibus-gtk Reboot the system http://askubuntu.com/questions/551025/ubuntu-14-10-ibus-only-working-in-the-search-applicatoin Cheers APaul

Creating local texmf directory in TexLive which can be synchronize

Okay, here is what I exactly wanted to do; I have to work on several computer and laptop. So I wanted to create local texmf directory in some cloud service folder (like dropbox) and then sync them across the different computer. But the problem is the local texmf directory in TexLive in Ubuntu is /usr/local/texlive/texmf-local So I have created a symbolic link of the texmf directory of dropbox inside the /usr/local/texlive/texmf-local/tex/latex/ . It is working fine. Hope this will work for you also. Cheers APaul

Playing online radio in Ubuntu

Image
You can easily play online radios in Ubuntu using Rhythmbox music player. First you have to add the radios to Rhythmbox. You can find you huge no of online radios from the website shoutcast. Here is the step by step instructions. First go to  http://www.shoutcast.com/ . Then search for the radio you want to listen. Now click in the save button and save the link as .pls (play list) file.  Now go to the saved file and open it with Rhythmbox. This will add the radio channel in the radio option in the Rhythmbox. You can right click on the radio channel and change properties like gener, channel name etc as you want (except the channel location).  No just dubble click on the channel and it will start playing the radio channel.  Cheers APaul Source: http://askubuntu.com/questions/142360/finding-stations-for-rhythmbox

installing language pack from command line

To install language from terminal you have to first know the code for the language (for example bn is code for Bengali and hi is the code for Hindi). Now first install the basic language packages for your desktop using the following code: sudo apt-get install language-pack-[cod] language-pack-gnome-[cod] language-pack-[cod]-base language-pack-gnome-[cod]-base It is not still done, because every other software may have its won language pack. To know which more package you have to install more you can use the following command check-language-support -l [cod] And then install those packages also. Example: Suppose you want to install language pack for Bengali, so first run the command sudo apt-get install language-pack-bn language-pack-gnome-bn language-pack-bn-base language-pack-gnome-bn-base Then run check-language-support -l bn And then from list install language packs for all applications. Source: http://askubuntu.com/questions/149876/how-can-i-install-one-language...

Solving different time problem in windows and ubuntu

In Windows and Ubuntu dual boot machine you may some time find that the time are different. This is because windows treat BIOS clock time as local time while Ubuntu treat BIOS clock time as GMT. So Windows display same time as BIOS clock but Ubuntu add/subtract time difference from GMT and show. For example Indian standard time is +5:30 hour ahead of GMT. Ubuntu will add 5:30 hour with BIOS clock and show. So there will be always difference in Windows time and Ubuntu time. To solve it just run the following command  sudo gedit /etc/default/rcS and find the portion which says "UTC=yes" and chance it to "UTC=no"  (Without quotes)   Hope this will solve the problem.   Cheers APaul Source: http://ubuntuguide.net/fix-different-time-clock-between-windows-and-ubuntu

Marging partition in gparted

Image
  Figure 1: Main window of Gparted Figure 2: Resize/Move window We can resize our disk partition or marge with another partition in Ubuntu using gparted . First you have to install gparted using following command: $ sudo apt-get install gparted Now open gparted . You may need to give administrative password. When opened it will look like the figure. First you have to unmount the partition(s) you want to resize or marge. Just right click > unmount Again right click on the partition you want to resize or marge and then select resize/move option This will open another window like the second image, you can drag and resize your partition and marge with another partition. Now click on resize/move button. Your partition size should be changed now. For more detail answer visit the following link of askubuntu.com and check the several good answers. http://askubuntu.com/questions/51272/how-do-i-repartition-with-gparted Though this doesn't delete the data in ...

Flash player problem in chromium in Ubuntu 14.04

After Updating to Ubuntu 14.04 I have noticed that chromium is showing error message that Flash Player is not installed, even though it is installed and Firefox is working properly with this. Reason for this problem The reason behind this problem is, till now chromium used Netscape Plugin API for flashplayer support. But starting from Ubuntu 14.04 chromium stopped using Netscape Plugin API. Hence there will be a issue. Solution To solve this issue we will use pepper flash player. This is a stable version of flash player from google. There is a paper flashplayer available in Ubuntu repo, which will download and extract flashplayer and set up fro Chromium. To install this flash player run the following command in the terminal. sudo apt-get install pepperflashplugin-nonfree sudo update-pepperflashplugin-nonfree --install Now restart chromium browser, chromium will now play flashplayer properly. Hope this will be helpful for you. Cheers A.Paul

How to manually configure blogilo for blogger.com

To configure blogilo manually for blogger.com you need two things, 1) blogger userid and password. 2) BlogID.  The userid and password are the same that you use to login in the blogger.com To get blogid first go to blogger.com and login. In the dashboard click on the name of your blog. Look at the url, it should look something like this:  https://www.blogger.com/blogger.g?blogID=5078980559402776300#overview/src=dashboard . The no after blogID is your blogID, which is 5078980559402776397 in this case. Copy the no. Now open blogilo and go to Blog>add blog In the open window insert your userid and password in the respective field.  Next go to advance tab and insert the blogID Click OK Thats all, blogilo should now start working. You should see the list of previously published blogs. Cheers APaul

Using shell script to install multiple software at a time

Installing Linux os like Ubuntu is very easy. But the problem starts when we lost all the already installed software. We install lots of software. Problem starts when we start to re-install all the required software. We can create a list of software and re-install them as stated in the previous blog post . But the problem is if we want to install third party software which need to add repo. So I have found out another solution, in which I have created a bash shell which contain all the command including the adding repo commands. I have given a simple example bellow: #!/bin/bash apt-get install -y gnuplot wxmaxima qtoctave qtiplot  add-apt-repository -y ppa:ubuntu-wine/ppa  add-apt-repository -y ppa:tualatrix/ppa  apt-get updateapt-get install -y wine ubuntu-tweak Save the file with any name and .sh extension (eg. install_software.sh). Then make the file exicutable by running the following command in the directory that contain the file. sudo chmod a+x i...

Associating file to an perticular application through command line

Image
We can select which program will open a particular type of document from terminal command line using mimeopen command. This tool is very useful if your program is not showing up in right click and open with option (like in case of program installed through PlayOnLinux ). If you know full command how to open the program you can use mimeopen to associate particular document type with that program.  So first open a terminal. Then navigate to the perticular folder where your file is. And then run the following command. $ mimeopen -d filename.ext And then it will show all option that can open that document. As a last option there will be an option other. You can select any option, just enter the corresponding number and enter. If you choose other option then it will show you option the command. Enter the full command (may be with full path some time) and then that program will open that file. From now on when ever you double click on that file type, it will always open with the ...

Recovering deleted file

Some time we accidentally delete some important file, which we should not. If we simply delete it (moving to trash) we can easily recover it going to trash and restoring it. But if we permanently delete it (like using shift+delete key or emptying trash), it becomes very difficult to recover them. But we can do this using PhotoRec software. This can run in any kind of file system. You can even use it to recover lost photos from camera memory card or flash drive. This software is available for Linux, Windows and Mac. But here I will concentrate on Linux (mainly Ubunut) only. Installing PhotoRec First of all you have to install photorec using the following command sudo apt-get install testdisk Recovering File First open terminal and then run the following command sudo photorec and then first choose your drive form where you want to recover files, and then choose the option intel type. On the next screen choose the partition from where you want to recover the file. On next...

How to disable overlay scroll bar in Ubuntu 12.10

Hi, This is a short tip how to disable the Overlay Scrollbar in Ubuntu 12.10. If you are get used to the regular scrollbar of the previous version of the Ubuntu then you may want to disable it. To disable it just open a terminal, and then run the following command, gsettings set org.gnome.desktop.interface ubuntu-overlay-scrollbars false You also can disable it using dconf Editor . First open dconf Editor from the Unity Dash. Then go to com>canonica>desktop and then select interface and then change the scrollbar-mode to overlay pointer Hope this will be helpful. Cheers A.Paul

mp4 files playing problem in Ubuntu 12.10 in

Because of some bug in gstreamer0.10-plugins-bad, some time .mp4 file does not plays in totem video player (Ubuntu's default video player) in Ubuntu 12.10. There is a patch in launchpad to fix this problem. To install the patch follow the instruction bellow. sudo add-apt-repository ppa:diwic/gstreamer-h264-testing sudo apt-get update sudo apt-get dist-upgrade This will automatically change the plugin and after a restart you can play all video file with totem video player. Source: http://askubuntu.com/questions/143245/movie-player-wont-play-mp4-gxine-does/143374#143374 https://bugs.launchpad.net/ubuntu/+source/gst-plugins-bad0.10/+bug/973014

How to downgrade software if you have used ppa to upgrade it

In this blog I will tell you how to downgrade some software to Ubuntu's default version if you have upgraded that software using ppa. Many times we want to upgrade some software to its newest version. But Ubuntu does not provide update for all software except for some critical bug fixes or security update. But almost all software maintain there ppa for Ubuntu so that user can get the latest version of that software. But some time you may fill that you should not have upgraded that software to newest version as that is not properly integrated with Ubuntu. So you want to downgrade it. Here I will tell you how you can do that. First you have to install a ppa-purge software. You can do that simply using the following command, sudo apt-get install ppa-purge Now you can purge the ppa using the following command sudo ppa-purge ppa:user/ppa-name Which will automatically downgrade the software to default version of Ubuntu. Cheers APaul

How to Get Rid of Internal System Error Popups

Image
Apport is a debugging tool that automatically generates crash reports and submit it. In Ubuntu 12.04 we have seen that we always get popups showing error message "Sorry, Ubuntu 12.04 has experienced an internal error." as shown in above picture. This is because Apport is enabled by default in the newest version of Ubuntu (Ubuntu 12.04). To get rid of this message we have to disable the Apport, especially since most of the time there is no visible error/crashes. To disable this message we have to edit /etc/default/apport file using this code $sudo gedit /etc/default/apport and the change "enabled" from "1" to "0" , and them save the file. After completion the above steps Apport won't start after next reboots. But may be you also want to stop Apport in the current session only, you run the following command $sudo service apport stop You can also re-enable Apport by editing the same file again and changing "enabled" from ...

Setting http_proxy value to local bashrc file

When I connect my laptop to internet from my institute I had to connect it through proxy. But when I connect it from my room I have to connect it directly. So I have to change my proxy frequently. But I have observed that changing proxy through network manager does not actually change the value of "http_proxy" variable. Neither the export command actually work. So we have changed the value by changing the ~/.bashrc file and adding the proxy value. Use the following command to edit file. $gedit ~/.bashrc Then add the following line http_proxy="http://userid:pass_word@proxy:port/" https_porxy="https://userid:pass_word@proxy:port/" ftp_proxy="ftp://userid:pass_word@proxy:port/" You can also set the domain which should not use proxy by no_proxy environment variable. This will be coma separated string containing domain name. Like no_proxy="first.domain,secon.domain" you can also edit some other file like /etc/environment /etc/bash...

Micromax 3G usb modem on ubuntu 12.04

I am using Micromax 3G USB modem to access Internet for long time, and it was working fine with previous distribution of Ubuntu. I have recently upgraded my operating system from Ubuntu 11.10 to 12.04. After upgrading I have seen that system is not detecting my Micromax modem. Fortunately I found a very simple solution and here I am sharing it. You have to just edit the /etc/modules file. Use this code $ sudo gedit /etc/modules and then add this two line at the end of the file usbserial option This has worked for me. Hope this will also solve your problem. Cheers APaul NB: If you are using Ubuntu 12.10 probably the above method is not working. Check this post for work around.