Posts

How to insert table of content in the report using LaTeX

Image
Hi everyone, welcome to my blog where I share some tips and tricks on using LaTeX, a powerful document preparation system. Today, I'm going to show you how to insert a table of content in your LaTeX document. A table of content is a list of the sections and subsections of your document, along with their page numbers. It helps your readers to navigate your document and find the information they need. It also gives an overview of the structure and organization of your document. To insert a table of content in LaTeX, you need to use two commands: \tableofcontents and \section. The \tableofcontents command tells LaTeX where to place the table of content in your document. Usually, you put it right after the \begin{document} command. The \section command tells LaTeX the title of each section of your document. You can also use \subsection and \subsubsection commands to create sub-levels of sections. Here is an example of a LaTeX document with a table of content: ...
Fix - quick search box not visible in synaptic package manager.

Image
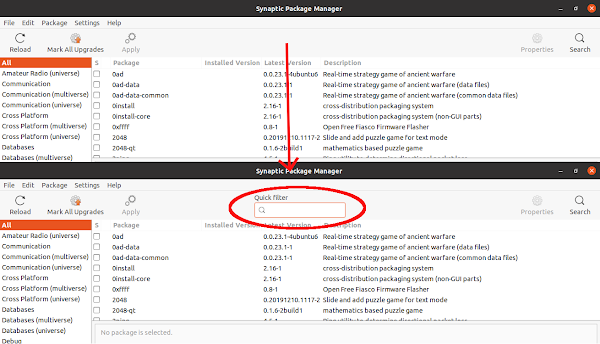
Problem I like to install software using synaptic package manager rather than using Ubuntu software center or using gnome software center . Recently I have noticed that the quick search or filter box is disapeared from the top bar of the synaptic package manager. I this post I will discuss how to get the quick filter box back. Solution The quick serch box is provided by the package apt-xapian-index , and it does not installed by default with synaptic since it is in the recomended dependency list. So to solve the problem, we just have to installed the package and rebuld the search index. To install the package, run the following command in terminal sudo apt install apt-xapian-index After installing the package, we have to rebuild the search index, which we can do by running the following command in the terminal. sudo update-apt-xapian-index -vf Now if you lunch the Synaptic Package Manager , we can see that the quick search box is there, and if we type anyth...

Setting default text alignment in blogger html view

Image
By default the text alignment of the blogger is left alignment. But I feel that the justify alignment looks better, and most of the time I write blog using "HTML view" since most of the time I share some kind of source code, which, I feel, is better using html view compared to compose view. So it will be better for me if I can add default text alignment to justify for whole document instead of doing for each paragraph. Here I am sharing how I do it in blogger. Solution One of the easiest way is to use the <style> function in the head secetion of html and setting the body to justify alignment using the body{text-align: justify} . So basically add the following section at the start of the document. <head> <style> body{text-align: justify} </style> </head> Now start writing your post inside the <body> section, the text will be aligned accordingly. Your will look something like thi: <bo...

Getting time google.com

Some time setting up time using ntp server does not work in Ubuntu, especially when you are inside some kind of proxy. And setting up time manually may not be accurate and obviously you need to know time properly. But there is way in which you can set time using time stamp from google. Just open the terminal and run the following command. date -s "$(curl -sD - google.com | grep ^Date: | cut -d' ' -f3-6)Z" Hope this will help. Cheers A. Paul

Syntax highlighting for code in blogger

Introduction: There is no straight forward or simple way to do syntax highlighting to share any code through blogger. But we can easily do that by using some third party service. One such service is highligtjs.org . Use the following steps for code highlighting. Solution: We have to work in html view rather than compose view of blogger. For syntax highlighting we have to first add JS script for importing CSS in the header of the html. To do that add the following line at the starting in the html view. <head> <link rel="stylesheet" href="//cdn.jsdelivr.net/gh/highlightjs/cdn-release@10.2.0/build/styles/androidstudio.min.css"> <script src="//cdn.jsdelivr.net/gh/highlightjs/cdn-release@10.2.0/build/highlight.min.js"></script> <script>hljs.initHighlightingOnLoad();</script> </head> Then start writing inside the body html tag, as...

LyX not showing math font properly

Problem: I faced this problem after reinstalling Linux Mint on my computer. I simply installed the LyX, TeXLive and other LaTeX-related software. But when I started using LyX, it was not showing the math fonts properly. It was showing ‘a’ instead of ‘alpha’ or ‘b’ instead of ‘beta’, even though its corresponding latex code was correct, and the pdf output was correct. See the following figure for more clarity. Reason: One of the required packages of LyX is fonts-lyx, which is needed to visually display the math symbol in LyX. It was not automatically installed in when I installed LyX, and hence the math symbols were not visible properly. Solution: The solution is simple. Just install the fonts-lyx package from the package manager or from the command line. To install it from the command line, use the following command. sudo apt install -y fonts-lyx That’s all, this should solve the problem. Cheers A.Paul

Installing SciDaVis on Ubuntu 20.04

Image
SciDaVis is a free and open source application to visualize and analyze scientific data. This is kind of clone to the proprietary and commercial applications like Origin and Igor pro. This application can generate 2D and 3D plot and perform functions like curve fitting or Fourier transform. Problem The application is not available in the Ubuntu software center, so we can not directly install from Ubuntu repository. Solution: The latest version of the application is available on the GitHub, you can see it here. The easiest way to install the application is by using the prebuilt binary package. You can either download the deb file or install by adding the repo. I prefer the later because it will automatically update the application using the Ubuntu software update. The instruction can be found here. Go to the link, select Ubuntu and select Add Repository and Install Manually. Following are the command to install int in Ubuntu 20.04. sudo sh -c "echo 'd...

Problem When Connecting Projector

When I connect my Ubuntu laptop it, unlike windows, automatically show same desktop as in your laptop. Rather it shows a secondary unknown display. I have tried to solve this problem from display setting but did not work. The solution is after logging in to the Ubuntu press Win+P key. It worked for me. Cheers APaul

Ibus is not working in Ubuntu 14.10

After updating to Ubuntu 14.10 Bus was not working, I have followed the answer given in the question (first question is working) and now it is working. I am using Ibus avro for bengli, I had to reinstall Ibus avro once again. Answer is given here. Run a system update: sudo apt-get update; sudo apt-get upgrade. Remove ibus-pinyin and install ibus-libpinyin: sudo apt-get remove ibus-pinyin; sudo apt-get install ibus-libpinyin. Open a terminal and run im-config, then click "OK" and "YES", then select "ibus" and click "OK" twice. Reinstall ibus and ibus-gtk: sudo apt-get --reinstall install ibus; sudo apt-get --reinstall install ibus-gtk Reboot the system http://askubuntu.com/questions/551025/ubuntu-14-10-ibus-only-working-in-the-search-applicatoin Cheers APaul

Changing page style defination of "fancyhdr" package.

In this post I will show how to change the definition of the page style (say empty) if you are using fancyhdr package. Just add the following type of code in the preamble of the document (before the \begin{document} ): \fancypagestyle{empty}{% \fancyhf{} % clear all header and footer fields \fancyfoot[R]{\bfseries \em \thepage } % except the center \renewcommand{\headrulewidth}{0pt} \renewcommand{\footrulewidth}{1pt}} Here you can use all kind of fancyhdr package command to specify you options and formatting. Hope this will be helpful. Cheers APaul

Placing float (table or figure) at the top of the page in otherwise empty page in LaTeX

In latex if a table is going to any empty page (page with only that table and no other text), the table is always aligned vertically centre. And that does not look good always. Even the float place holder like [t] or [ht] or [t!] kind of things does not work. But there is a work around, just paste the following code at the preamble of the document (before \begin{document} ); \makeatletter \setlength\@fptop{0\p@} \makeatother Hope this will solve the problem. Cheers APaul

Creating local texmf directory in TexLive which can be synchronize

Okay, here is what I exactly wanted to do; I have to work on several computer and laptop. So I wanted to create local texmf directory in some cloud service folder (like dropbox) and then sync them across the different computer. But the problem is the local texmf directory in TexLive in Ubuntu is /usr/local/texlive/texmf-local So I have created a symbolic link of the texmf directory of dropbox inside the /usr/local/texlive/texmf-local/tex/latex/ . It is working fine. Hope this will work for you also. Cheers APaul

Showing proper icon for the program installed through Wine

Suppose you have installed foo.exe thorough wine. But when you lunching it the unity side panel showing wine icon instead of foo icon. To solve this go to folder ~./local/share/applications/   Open foo.desktop in your favorite text editor. Then append the line StartupWMClass=foo.exe in the file (make sure to change foo to your actual application name) and save it. Now lunch the application it should show proper icon. 

bclogo package to produce boxed and highlighted text in LaTeX

Image
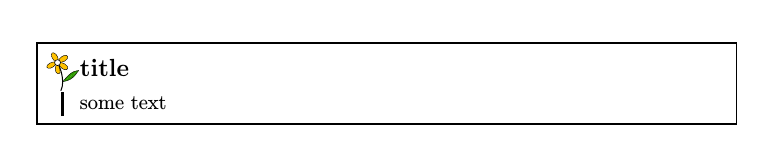
When we write article, sometime we need to highlight some portion (may be some comment, idea, home task or some hint) to differentiate it from the rest of the article. LaTeX gives us a very good and elegant way to do the job using bclogo package. Here I will describe how to use bclogo package. First you have to load the package using \usepackage[tikz]{bclogo} . And the syntax is as followis: \begin{bclogo}[options]{title} content text \end{bclogo} For example \documentclass{article} \usepackage{lipsum} \usepackage[tikz]{bclogo} \author{Apurba Paul} \title{check boxed minipage} \begin{document} \begin{bclogo}{title} some text \end{bclogo} \end{document} The above code will produce something like this You can also change the background color, shape of the rectangle and the the logo. For example the following code will produce something like the next image: \documentclass{article} \usepackage{lipsum} \usepackage[tikz]{bclogo} \author{Apurba Paul} \title{check boxed m...

Using boxedminipage environment in LaTeX

Boxedminipage is an environment that is used in LaTeX to crate a pseudo page environment with border around it in your actual page. Here I am saying how to use it. First import the package using \usepackage{} command in the preamble. \usepackage{boxedminipage} Syntax to use this package is \begin{boxedminipage}{<width_of_the_minipage>} minipage content \end{boxedminipage} This environment can be used if you want to put some thing together but it is spliting up over more than one pages because this create a float, and so the box will not allow to creat page break inside it like figure environment. Also you can use this environment to place some text at the lift or right not extending more than one line. Like we put address, salutation, or header in Letter. If you don't want box around it yo can use minipage environment. Here I am giving a simple example \documentclass{report} \usepackage{boxedminipage} \author{APaul} \title{Example of boxedminipage en...

Page no positioning in latex using fancyhdr package.

 We can manually position the page no. in LaTeX using fancyhdr package. To position page no. (or any other thing) in header or footer there are total six position options, left, right and centre in header and footer. The corresponding commands are given in the table bellow position fancy head command left header \lhead right header \rhead centre header \chead left footer \lfoot right footer \rfoot centre footer \cfoot And the page no inserted by the command \thepage . Now suppose I want to insert page no in the left side of each page I can use following code: \documentclass[a4paper, 11pt]{report} \usepackage{amsmath}%just some package not necessary to \usepackage{graphicx}%test this page no. \usepackage{fancyhdr} \pagestyle{fancy} %declaring page style \lhead{\thepage} %page no inserted in left side of header \chead{} \rhead{} \lfoot{} \cfoot{} \rfoot{} \author{Apurba~Paul} \title{Inserting page no in custom position in \L...

Playing online radio in Ubuntu

Image
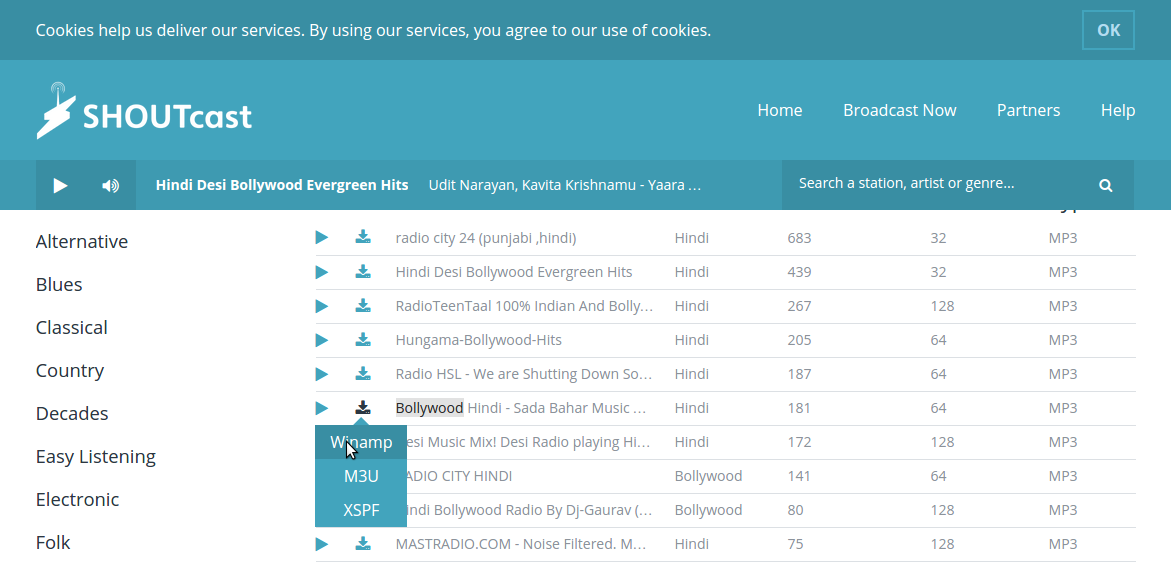
You can easily play online radios in Ubuntu using Rhythmbox music player. First you have to add the radios to Rhythmbox. You can find you huge no of online radios from the website shoutcast. Here is the step by step instructions. First go to  http://www.shoutcast.com/ . Then search for the radio you want to listen. Now click in the save button and save the link as .pls (play list) file.  Now go to the saved file and open it with Rhythmbox. This will add the radio channel in the radio option in the Rhythmbox. You can right click on the radio channel and change properties like gener, channel name etc as you want (except the channel location).  No just dubble click on the channel and it will start playing the radio channel.  Cheers APaul Source: http://askubuntu.com/questions/142360/finding-stations-for-rhythmbox

-E option to export environment variable to sudoer

Have you ever faced a problem adding ppa (Personal Package Archive) in your computer. If you are getting error like Please check your internet connection then probably the reason is sudo is not able to find proxy setting. This may happen if proxy is only set to .profile or .bashrc file. So to overcome this problem I have already wrote one post before. Here I am showing another option which is bit easier option. Here you have to add -E while running sudo (note: E is in capital letter). So -E option actually preserve the environment option . See the Sudo Manual for more detail. So to add ppa run the following command sudo -E add-apt-repository ppa:<paa_name> This should work now. Cheers APaul Source http://askubuntu.com/questions/212132/i-cant-add-ppa-repository-behind-the-proxy http://www.sudo.ws/sudo/man/sudo.html http://apurbapaul.blogspot.in/2012/09/adding-repository-behind-proxy-using.html

installing language pack from command line

To install language from terminal you have to first know the code for the language (for example bn is code for Bengali and hi is the code for Hindi). Now first install the basic language packages for your desktop using the following code: sudo apt-get install language-pack-[cod] language-pack-gnome-[cod] language-pack-[cod]-base language-pack-gnome-[cod]-base It is not still done, because every other software may have its won language pack. To know which more package you have to install more you can use the following command check-language-support -l [cod] And then install those packages also. Example: Suppose you want to install language pack for Bengali, so first run the command sudo apt-get install language-pack-bn language-pack-gnome-bn language-pack-bn-base language-pack-gnome-bn-base Then run check-language-support -l bn And then from list install language packs for all applications. Source: http://askubuntu.com/questions/149876/how-can-i-install-one-language...

Solving different time problem in windows and ubuntu

In Windows and Ubuntu dual boot machine you may some time find that the time are different. This is because windows treat BIOS clock time as local time while Ubuntu treat BIOS clock time as GMT. So Windows display same time as BIOS clock but Ubuntu add/subtract time difference from GMT and show. For example Indian standard time is +5:30 hour ahead of GMT. Ubuntu will add 5:30 hour with BIOS clock and show. So there will be always difference in Windows time and Ubuntu time. To solve it just run the following command  sudo gedit /etc/default/rcS and find the portion which says "UTC=yes" and chance it to "UTC=no"  (Without quotes)   Hope this will solve the problem.   Cheers APaul Source: http://ubuntuguide.net/fix-different-time-clock-between-windows-and-ubuntu